Ib txoj hauv kev yooj yim los pab kom disk sau caching hauv Windows 10!
Yog tias koj tau siv Windows ib ntus, koj tuaj yeem paub tias lub operating system muaj cov cai sib txawv rau cov khoom siv sab nraud txuas nrog koj lub computer ntawm USB chaw nres nkoj. Txhua lub cuab yeej txuas nrog nws tus kheej txoj cai.
Los ntawm lub neej ntawd, koj lub hard drive sab hauv siv disk sau caching los txhim kho kev ua haujlwm. Lub disk sau cache feature hauv Windows 10 ib ntus tso cov lus txib hauv lub cim xeeb kom txog thaum lub cuab yeej cia npaj txhij.
Lub feature zoo heev txhim kho kev ua tau zoo raws li qhov kev zov me nyuam tsis tas yuav tos rau sab hauv drives kom ua haujlwm. Los ntawm lub neej ntawd, lub feature tau qhib rau tag nrho cov hard drives sab hauv, tab sis nws yog neeg xiam oob qhab rau lwm hard drives los yog tshem tau disks xws li SD card, Pendrive, thiab lwm yam.
Cov neeg siv tseem tuaj yeem pab lossis lov tes taw disk sau cache rau ib tus neeg tsav los ntawm tus thawj tswj ntaus ntawv. Hauv tsab xov xwm no, peb yuav qhia cov ncauj lus kom ntxaws txog yuav ua li cas thiaj li pab tau lossis lov tes taw disk sau caching hauv Windows 10 khoos phis tawj.
Pab lossis lov tes taw disk sau caching hauv Windows 10 PC
Tseem ceeb: Enabling lossis disabling disk sau caching yog ib qho yooj yim heev rau Windows 10. Txawm li cas los xij, nws tsuas yog rau cov neeg siv siab heev uas paub lawv ua dab tsi. Ib qho kev teeb tsa tsis raug yuav ua rau cov ntaub ntawv poob. Yuav kom nyob rau sab nyab xeeb, nco ntsoov tsim qhov system rov qab taw tes ua ntej hloov pauv rau kev teeb tsa cov cuab yeej.
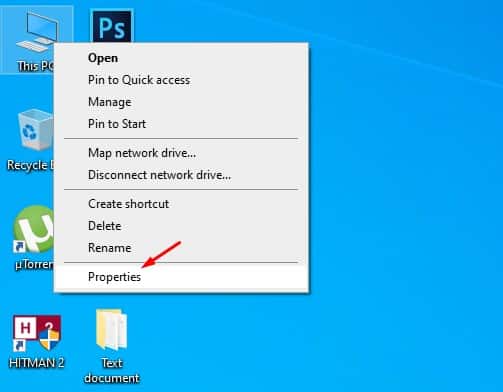
Kauj ruam 1. Ua ntej, right-click ntawm lub icon "Qhov no PC" ntawm lub desktop thiab xaiv "Tus yam ntxwv"
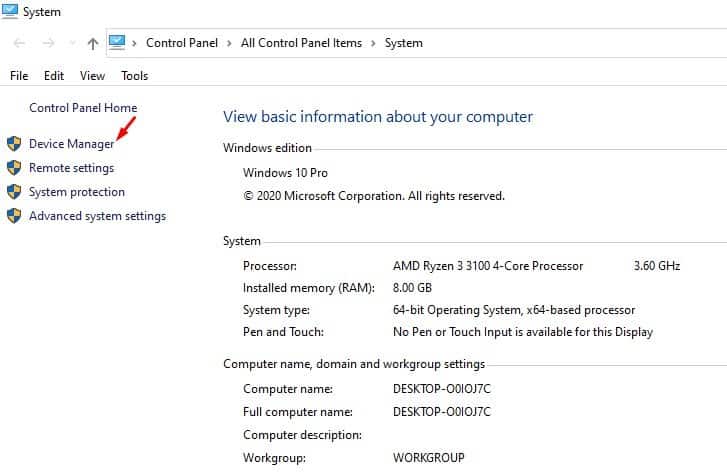
Kauj ruam 2. Ntawm nplooj ntawv System Properties, nyem "Device Manager"
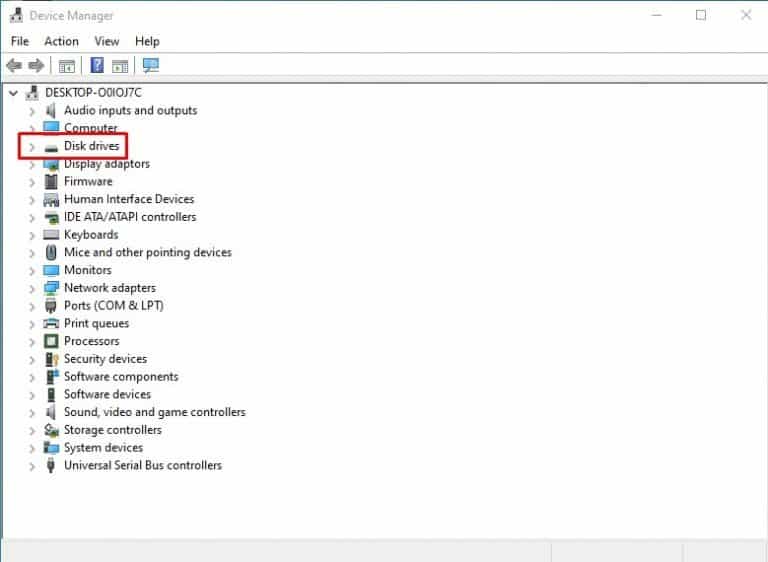
Kauj ruam 3. Hauv Device Manager, nthuav "Drives"
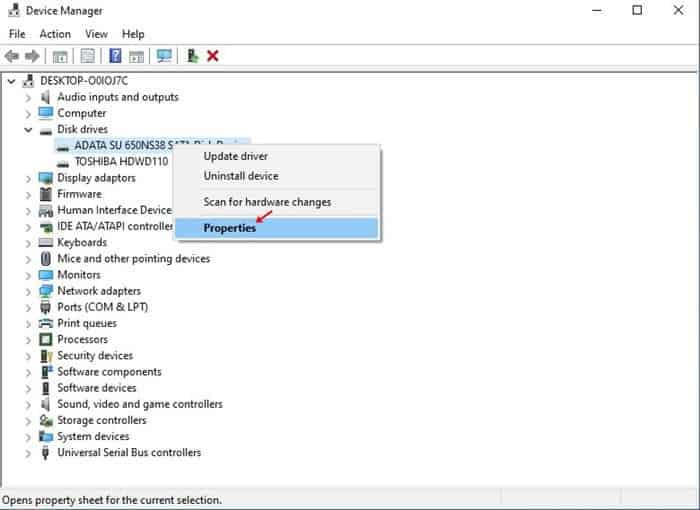
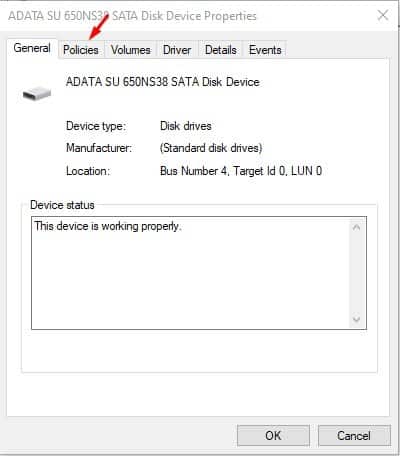
Kauj ruam 4. Tam sim no txoj cai-nias rau ntawm lub tsav uas koj xav kom qhib disk sau caching thiab xaiv "Tus yam ntxwv"
Kauj ruam 5. Ntawm nplooj ntawv khoom, nyem lub tab “Txoj Cai” .
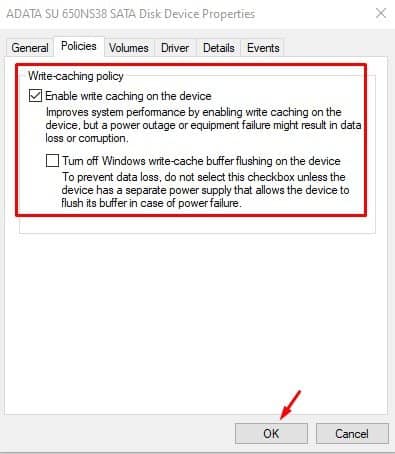
Kauj ruam 6. Raws li Txoj Cai, koj tuaj yeem ua tau Pab los yog lov tes taw disk sau caching feature .
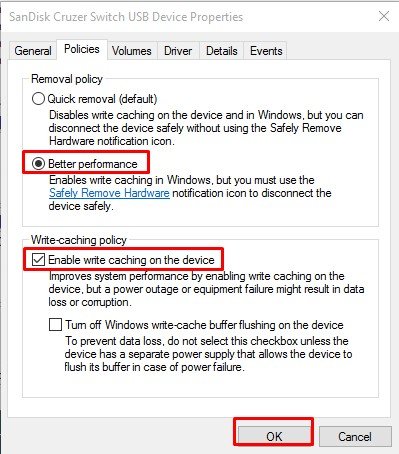
Kauj ruam 7. Yog tias koj xav pab kom disk sau caching hauv lub cuab yeej tshem tau, xaiv “Kev ua tau zoo dua” Tom qab ntawd qhib qhov "Sau caching" kev xaiv.
Qhov no yog! Kuv ua tiav. Thaum koj qhib lub feature, ua kom nws tus cwj pwm siv Safely Remove Hardware los ntawm lub taskbar.
Yog li, tsab xov xwm no yog hais txog yuav ua li cas thiaj li pab tau lossis lov tes taw disk sau caching hauv Windows 10 PCs. Kuv vam tias tsab xov xwm no yuav pab tau koj! Thov share rau nej cov phooj ywg thiab.
